Throwing imparts two motions to a knife: forward motion and spin.
Forward motion is required to get the knife from your hand to the target. Spin must be timed so that the knife is traveling point foremost when it strikes the target.
Controlling the spin is the hardest part of knife throwing. The key to controlling the spin of the knife is consistency. Achieving consistency begins with practicing each throw using the same grip, and throwing each time from the same distance from the target.
Gripping the Knife:
A knife is thrown either by the handle or by the blade; our knife is thrown by the handle. So let’s get to the fundamentals.
The handle grip closely resembles the ordinary grip used when cutting. Grasp the knife with the full length of the handle in the palm, the fingers closing naturally, the thumb fall into a natural position on the opposite side. Comfortable control without exerting much grip is the goal. During the throwing motion and through the release, the blade is held vertically, with the edge toward the ground.
Professional knife throwers always use vertical grips, whether by the handle or the blade. Beginners should remember this when experimenting with different methods of throwing.
Gripping the knife with all four fingers will impart a fairly slow spin. This is desirable for easier control. With practice, it’s possible to use judgment to control the spin through a combination of grip, stance and arm motion, to stick knives at a variety of distances from the target. But it’s frustrating to a beginner to try this, so let’s skip this topic.
The Throwing Stance and Motion:
Assume a comfortable standing position facing the target, with knees slightly bent and one foot advanced well ahead of the other. A right-hander should advance the left foot, a left-hander should advance the right foot. Grip the knife as described above. Use a natural overhand throwing motion with plenty of follow-through, pitch the knife swiftly at the target and aim at a point just at eye-level. Release the knife as the aim reaches horizontal, allowing the knife to slip smoothly out of your fingers. There must be no wrist movement at the moment of release. Try to always release the knife as straight as possible at the target, avoiding any yaw, which can make an otherwise well-thrown knife to miss the aiming mark by three or four inches. The knife should be thrown hard enough to follow a flat trajectory to the target, but a violent throwing motion is undesirable.
Concentrate on using a true overhead motion with as little sidearm as possible. Placing your leading foot exactly on the mark for a given distance is essential for good practice and you should develop a habit of taking up your position precisely.
Full follow-through is important to avoid the common error of flipping, which is, halting the throwing motion at the instant of release. This imparts too much spin to the knife for easy control. (This kind of throwing motion can be used at short distances when a quick spin is needed, but is not very useful for throws longer than a half-turn.
The Full-Turn Throw:
In this throw, the knife is gripped by the handle and spins though one full turn on its way to the target. The approximate correct distance to stand from the target is fifteen feet (5 good paces). You need to experiment a few inches either way to get your exact distance.
Sticking Solidly:
When a knife doesn’t stick in the target and stay there, the throw is a failure. In competitions, you only get one throw, and the knife that fails to stick might as well have missed the target altogether.
Our knife is thrown exclusively with a handle grip. It can strike and stick the target with the handle almost vertical. That nicely curved Bowie point hooks into the wood and stays there.
MOST OF ALL BE SAFE, HAVE FUN AND OF COURSE PRACTICE, PRACTICE, PRACTICE
Throwing Tomahawks 101
How to throw a tomahawk
The first thing you will need is something to throw at. The best thing is the end of a log. The bigger the log the better, because it is easier to hit. A slice off the end of a log about one foot thick is perfect. This is known as a hawk block. If your block is not very big you should set it something (another slice of wood is good) so that it is off the ground. It would be good if the center of your block is about waist high. If you can’t get a log, a heavy piece of lumber will do. Remember, it’s easier to stick a tomahawk in the end of the grain, but if you have to use a piece of lumber, set it up so the grain runs up and down. Whatever you get, be sure to set it up in a safe place and somewhere that if you miss and throw past, you won’t lose your tomahawk.
To begin, stand with your back to the block and step away about five or six steps. Turn and face the block. Hold the tomahawk by the end of the handle just as if you were going to chop wood. The most important thing to remember when throwing is not to flip the tomahawk. Throw it just as you would a baseball and it will turn by itself. Throw it like you were playing catch, not like pitching a fastball.
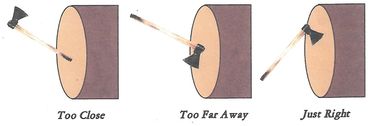
The trick is to throw it the same every time. If it doesn’t stick, move closer or farther away. From five or six steps away, if the tomahawk hits the block before it makes one full turn, then you are too close, move farther away. If it turns more than one full turn before it reaches the block, move closer. Move only a little bit each time, it doesn’t take much. Put a marker on the ground so you know exactly where you are throwing from. It won’t take long before you will be standing in the same place sticking it every time. Then you can practice for accuracy. Most of all be safe, and have fun!
Due to the hand-crafted nature and high demand of our custom products please allow 8-12 weeks for delivery of products. Usually orders are filled much faster than this but various delivery times are possible.